Amazon Web Services (AWS) Deployment Configuration—Manual Mode (Essentials Subscription)
Alert Logic allows for an optional, manual deployment mode for AWS deployments. Alert Logic recommends Manual Mode for AWS deployment creation only if you want to deploy and maintain scanning instances in your deployments.
Deployment creation requires that you be logged into your Alert Logic account and the AWS account you want this deployment to monitor and protect.
Alert Logic does not permanently collect CloudTrail logs with the Essentials Subscription. The purpose of the CloudTrail logs is for temporary collection to gather information about the asset model. Permanent CloudTrail log storage requires a Professional subscription. This guide assumes you have already configured CloudTrail to write these messages to an S3 bucket. For assistance with configuring CloudTrail, see Creating and updating a trail with the console for more information.
To start creating your AWS deployment:
- In the Alert Logic console, click the
 Configure menu item, and then click Deployments.
 - Click the add icon (
 ), and then select Amazon Web Services (AWS).
 - Type a name for your deployment, and then click SAVE AND CONTINUE.
- Select Automatic Mode, and then click SAVE & CONTINUE.
IAM policy and role creation
To protect your AWS deployment, you must set up an AWS IAM policy and role to allow Alert Logic access to your AWS account. Alert Logic provides an AWS CloudFormation template to automate creation of the correct policy and role for the deployment. You can also choose to manually set up the IAM policy and role.
Cross-account roles allow Alert Logic to access your AWS account. AWS role creation requires that you provide an AWS policy, a document that specifies the permissions assigned to the AWS role you create for Alert Logic to access to your AWS account.
You can also choose to create an IAM policy with minimal permissions. For more information, see Configure AWS Minimal Permission Deployment.
IAM policy and role setup using AWS CloudFormation
Alert Logic recommends you use the Alert Logic CloudFormation template for quick, convenient IAM policy and role creation. The CloudFormation template creates the appropriate IAM role that allows your deployment access to your AWS assets.
Click CLOUDFORMATION SETUP, and then follow the instructions in the Alert Logic console and the AWS console.
IAM policy and role setup using manual IAM setup
Select manual IAM set up if your AWS account permissions allow you to create an IAM policy, but does not have the permissions to run CloudFormation.
Click MANUAL IAM SETUP, and then follow the instructions on the screen.
If your CloudTrail log collection is encrypted with KMS, do the following:
{
   "Sid":"AllowDecryptOfCloudTrailKey",
   "Action":[
      "kms:Decrypt"
   ],
   "Effect":"Allow",
   "Resource":"<KMS KEY ARN>"
}
Enter your Role ARN
In the Alert Logic console, enter the ARN you copied from the AWS console after you created the IAM role.
Set up centralized CloudTrail collection
If you are configuring an organizational CloudTrail service or would like to centralize the CloudTrail logs from multiple accounts, set up an extra IAM role in your receiving (centralized) account. For more information about centralized log collection, see Should you centralize CloudTrail log collection?.
To set up the centralized CloudTrail collector:
- Navigate to the Role ARN page by clicking Configure > Deployments > <Your Deployment>.
- Under the ARN you entered for original setup, click the
 info icon for I want to configure centralized CloudTrail log collection for this deployment., and then follow the steps to set up your centralized IAM role.
If you are centralizing your CloudTrail log collection, do the following:
{
      "Sid": "Allow alertlogic to decrypt log files",
      "Effect": "Allow",
      "Principal": {
        "AWS": [
          "<ARN OF SECONDARY CENTRALIZED CT ROLE>"
        ]
      },
      "Action": "kms:Decrypt",
      "Resource": "*"
}
Asset Discovery
Allow Alert Logic a moment to discover your assets. When discovery is complete, click CONTINUE. Alert Logic displays the assets discovered in your account in topology diagrams. To learn more about topology, click Topology.
Add external assets
You can add external assets by domain name or IP address. Alert Logic will scan these external assets that you define.
To add external assets:
- Click the External Assets tab, click the add icon (), and then choose DNS Name or External IP.
- If you chose DNS Name, enter your fully qualified domain name in the field.
- If you chose External IP, name your external IP address, and then enter the IP address in the field.
- Click SAVE.
Scope of Protection
Alert Logic discovers and organizes deployments into a visual topology where you can select the desired levels of protection for your assets.
You can define the scope of your protection per region or network. Each network appears within its protected region. Click a region or individual network to set the service level or leave it unprotected, and then click SAVE SCOPE. You must choose one of the following levels of coverage:
- Unprotected
-
The choices available for scope of protection correspond directly with your entitlement. Although a Professional subscription includes all the features of Essentials, a Professional customer cannot set the protection scope to Essentials unless the account has a separate Essentials subscription.
You can change the protection level later as needed.
Options
Configure Cross-Network Protection
You have the option to set up Cross-Network Protection to create connections across networks, in the same or different deployment, but within the same account. Cross-Network Protection allows other networks to use resources from a protecting network with an assigned network appliance. The common places for Cross-Network Protection use are Amazon Web Services (AWS) VPC Peering, AWS Transit Gateway, and Microsoft Azure VNet Peering.
A protecting network hosts the appliance. The network protected by the protecting network is the protected network. For more information on Cross-Network Protection, see Cross-Network Protection.
Only manual mode deployments have the Cross-Network Protection option.
To configure Cross-Network Protection:
- On the side navigation, click Options under Protection.
- On the Cross-Network Protection tab, click the network or region you want to protect in the topology diagram, or in the Search Assets field, search for the network or region you want to protect.
- Click the search field to search or type the name of a protecting network, and then select one.
- Click SAVE.
The protecting network and protected network are now visible in the topology diagram with distinguishing icons. The Cross-Network Protection Breakdown, on the top left of the topology graph, provides an overview of your Cross-Network Protection connections.
View protected networks
To view protected networks:
- Click the protecting network icon (
 ) to see the number of protected networks currently connected.
 - Click the details icon (
 ) to see a slideout panel that contains protected network names.
View protecting networks
To view protecting networks, click the protected network icon ( ).
).
Agent-Based Scanning
You have the option to enable agent-based scanning. Agent-based scanning improves the efficiency, accuracy, and usability of Alert Logic vulnerability scanning features. Agent-based scanning provides the vulnerability assessment coverage of authenticated network scanning without the need to manage credentials and with a reduction in network traffic and impact. To learn more about agent-based scanning, see Agent-Based Scanning.
Vulnerability Scanning
The next step is to configure vulnerability scans to protect your deployment.
Scan Schedules
When you create a new deployment, Alert Logic automatically creates default scan schedules to perform external and internal vulnerability scans on all non-excluded assets and ports in your AWS security groups. If agent-based scanning is enabled, the default agent-based scan schedule performs scans for vulnerabilities and missing patches on all non-excluded hosts with an Alert Logic agent installed. You can schedule when you want to perform specific scans for all or selected assets and ports from the Agent-Based Scans, Internal Network Scans, and External Network Scans tabs. For more information, see Manage Vulnerability Scan Schedules.
To initiate vulnerability scanning, review the schedules, make any changes, and then activate the schedules you want to use. Click NEXT.
Scan Exclusions
You can exclude assets from each type of vulnerability scan. You can exclude ports from internal and external network scans. You can also use AWS tags to exclude assets, including subnets, from internal network scans and agent-based scans.
For more information, see Exclude assets and ports from scans.
Scan Credentials
You can add credentials to your regions or assets to use with internal network scans. You can add multiple credential types, but only one credential of each type. If you provide credentials, Alert Logic performs comprehensive authenticated vulnerability checks for missing patches and misconfigurations using package information and other local sources of data. For hosts on which Alert Logic performs agent-based scanning, you do not need to provide credentials. If you do not provide credentials or enable agent-based scanning, scans on your assets occur using only methods available to unauthenticated users.
For more information, see Manage your credentials.
Scan Performance
For internal and external vulnerability scans, the maximum number of IPs scanned concurrently is ten by default.
You can choose fewer concurrent scans to reduce scan traffic. A lower number results in slower scans and a longer scan duration. For faster scans and a shorter scan duration, choose a higher number of concurrent scans. The number you choose is a maximum limit. The actual number of concurrent scans does not exceed the selected amount and depends on factors such as appliance resource availability and network bandwidth during the scan window.
For more information, see Adjust scan performance.
Configuration Topology
This topology diagram provides an overview of your scope of protection. You can see which assets are unprotected, or being scanned at the Essentials, Professional, or Enterprise levels.
The protection breakdown displays how many assets are unprotected, excluded, and protected, along with the number of protected assets in each level.
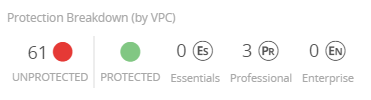
You can search for specific assets. The protection breakdown updates as it finds specific assets.
Deploy scanning appliances
You must deploy a scanning appliance into each VPC you specified as protected byEssentials level of service in your scope of protection. Alert Logic provides a CloudFormation template to help you deploy a scanning appliance to the AWS deployment. Right-click and copy the link to this CloudFormation template to use in the steps below.
To use the CloudFormation template, you need information about the VPCs and subnets in your account. To find your AWS VPC and subnet information, log into the AWS console, and access the VPC Management Console. For more information, see the AWS documentation, VPCs and Subnets.
To use the CloudFormation template to deploy a scanning appliance:
- Log into the AWS console.
- Access the CloudFormation service.
- On the Stacks page, click Create stack, and then in the drop-down options, select With new resources (standard).
- On the Create stack page, under Specify template, select Amazon S3 URL as the Template source, and then paste the CloudFormation template URL provided above into the Amazon S3 URL field.
- Click Next.
- On the Specify stack details page, enter a stack name in the Stack name field, and then under Parameters, enter the following required information:
- In the Target VPC field, select the target VPC you want to protect from the drop-down options.
- In the Target VPC CIDR field, enter the VPC CIDR range. You can get this from the Target VPC drop-down option selected in the previous step.
- In the Target Subnet ID field, select the target subnets you want to protect. Alert Logic recommends you select all subnets under the VPC you want the appliance to be able to deploy in.
- Set the Assign Public IP field as true if the subnets are public or as false if they are private.
- Under the Scan appliances configuration section, enter the Number of Scan instances to deploy (as an integer value between 1 and 10), and select the AWS instance type. By default it is configured to deploy 1 instance of type c5.large.
- Click Next.
- On the Configure Stack Options page, click Next.
- On the review page, select the three check boxes acknowledging the capabilities and transforms, and then click Create stack.
- From the CloudFormation stacks page, ensure that this stack appears with the status CREATE_COMPLETE.
Repeat this procedure for each VPC where you need to deploy an IDS and/or a scanning appliance.
Install agent
If you enabled agent-based scanning, install the agent on each host for which you want Alert Logic to perform agent-based scans.
Click the links below for more information and to download the appropriate agent:
Update the Alert Logic agent firewall rules
Ensure the proper outbound firewall rules are in place for the node where you installed the agent. For information about firewall rules, see Alert Logic firewall rules for the US or UK/EU.
Update the Alert Logic appliance firewall rules
If you used a
Ensure the proper inbound and outbound firewall rules are in place for the appliance. For information about firewall rules, see Alert Logic firewall rules for the US or UK/EU.
Verify the health of your deployment
After you create your deployment, access the Health console in the Alert Logic console to determine the health of your networks, appliances, and agents, and then make any necessary changes.