Data Center Deployment Configuration for Google Cloud Platform (Essentials Subscription)
Alert Logic allows you to use a Data Center deployment to monitor your assets on the Google Cloud Platform. Before your deployment can monitor your assets, you must install an Alert Logic appliance and agents to your Google Cloud environment.
Before you begin
Before you create your first Data Center deployment for Google Cloud Platform, you must:
- Install the gcloud command line tool for use with your GCP account. For more information about the gcloud CLI, see this Google Cloud Platform document.
- Configure your system to launch and use Jinja templates.
Overview
The basic workflow to create a Data Center deployment to monitor your assets on the Google Cloud Platform is as follows:
- Create a Data Center deployment in the Alert Logic console.
- Create one or more appliance virtual machines (VM) in the Google Cloud Platform projects that are in the Data Center deployment scope of protection.
- Claim the appliances.
- Create one or more appliance virtual machines in the Google Cloud Platform projects that are in the deployment scope of protection.
- Claim the appliance(s).
- Install the Alert Logic agent on the hosts where you want to perform agent-based scanning.
Create a Data Center deployment for your Google Cloud Platform assets
You must create the Data Center deployment prior to creating and claiming the appliance VMs. The appliance claim process requires information from your Alert Logic account.
You can access the Deployments page from the ![]() Configure menu item in the Alert Logic console. To add a Data Center deployment, click the add icon (
Configure menu item in the Alert Logic console. To add a Data Center deployment, click the add icon (![]() ), and then click Data Center.
), and then click Data Center.
Name your deployment
In the Deployment Name field, type a descriptive name for the deployment you want to create, and then click SAVE AND CONTINUE.
Add assets
For Data Center deployments, Alert Logic suggests you add your assets using discovery scans. While you can add your assets manually, weekly discovery scans ensure your Data Center deployments are configured with the right ranges.
You can manually add your assets by network, subnet, domain name, or IP address to be scanned. Add the requested information for every virtual network and subnet you want to monitor.
To add a network:
- In the Networks tab, click the add icon (
 ), and then select Network.
 - Type a name for the network, and add the Private CIDR(s) for each subnet.
Alert Logic recommends you add multiple /24 or smaller subnets instead of a CIDR over /16 to allow Alert Logic to operate and scan faster.
- Select Do not use agents for IDS traffic. My network automatically forwards traffic to my appliances through a port mirroring feature. if your network equipment is configured to SPAN or another port mirroring feature.
- Click SAVE.
A SPAN configured network forwards your Network IDS traffic to Alert Logic appliances, which allows Alert Logic to analyze that traffic.
To add a subnet:
- In the Networks tab, click the add icon (), and then select Subnet.
- Name the subnet, select the network, add the Private CIDR, and then click SAVE.
- In the DNS Names and Public IPs tab, click the add icon (), and then select DNS Name.
- Add the domain name, and then click SAVE.
- In the DNS Names and Public IPs tab, click the add icon (), and then select Public IP.
- Name the IP address, add the CIDR, and then click SAVE.
When you are finished, click NEXT.
Schedule discovery scans
When you create a Data Center deployment, Alert Logic automatically creates a default discovery scan schedule to find new assets or asset changes in your internal networks. You can schedule when you want to perform discovery scans for all or selected assets. For more information, see Manage Discovery Scan Schedules.
Scope of Protection
Alert Logic discovers and organizes deployments into a visual topology where you can select the desired levels of protection for your assets.
You can define the scope of your protection per region or network
- Unprotected
-
The choices available for scope of protection correspond directly with your entitlement. Although a Professional subscription includes all the features of Essentials, a Professional customer cannot set the protection scope to Essentials unless the account has a separate Essentials subscription.
You can change the protection level later as needed.
Options
Configure Cross-Network Protection
You have the option to set up Cross-Network Protection to create connections across networks, in the same or different deployment, but within the same account. Cross-Network Protection allows other networks to use resources from a protecting network with an assigned network appliance. The common places for Cross-Network Protection use are Amazon Web Services (AWS) VPC Peering, AWS Transit Gateway, and Microsoft Azure VNet Peering.
A protecting network hosts the appliance. The network protected by the protecting network is the protected network. For more information on Cross-Network Protection, see Cross-Network Protection.
To configure Cross-Network Protection:
- On the side navigation, click Options under Protection.
- On the Cross-Network Protection tab, click the network or region you want to protect in the topology diagram, or in the Search Assets field, search for the network or region you want to protect.
- Click the search field to search or type the name of a protecting network, and then select one.
- Click SAVE.
The protecting network and protected network are now visible in the topology diagram with distinguishing icons. The Cross-Network Protection Breakdown, on the top left of the topology graph, provides an overview of your Cross-Network Protection connections.
View protected networks
To view protected networks:
- Click the protecting network icon (
 ) to see the number of protected networks currently connected.
 - Click the details icon (
 ) to see a slideout panel that contains protected network names.
View protecting networks
To view protecting networks, click the protected network icon ( ).
).
Agent-Based Scanning
You have the option to enable agent-based scanning. Agent-based scanning improves the efficiency, accuracy, and usability of Alert Logic vulnerability scanning features. Agent-based scanning provides the vulnerability assessment coverage of authenticated network scanning without the need to manage credentials and with a reduction in network traffic and impact. To learn more about agent-based scanning, see Agent-Based Scanning.
Vulnerability Scanning
The next step is to configure vulnerability scans to protect your deployment.
Scan Schedules
Alert Logic performs scans to protect your deployment. When you create a new Data Center deployment, Alert Logic automatically creates default scan schedules to perform external and internal vulnerability scans on all non-excluded assets. The default scan schedules also perform external and internal vulnerability scans on all non-excluded TCP ports and common UDP ports. If agent-based scanning is enabled, the default agent-based scan schedule performs scans for vulnerabilities and missing patches on all non-excluded hosts with an Alert Logic agent installed. You can schedule when you want to perform specific scans for all or selected assets and ports from the Agent-Based Scans, Internal Network Scans, and External Network Scans tabs. For more information, see Manage Vulnerability Scan Schedules.
To initiate vulnerability scanning, review the schedules, make any changes, and then activate the schedules you want to use. Click NEXT.
Scan Exclusions
You can exclude assets from agent-based scans. You can exclude assets or ports from internal and external network scans.
For more information, see Exclude assets and ports from scans.
Scan Credentials
You can add credentials to your regions or assets to use with internal network scans. You can add multiple credential types, but only one credential of each type. If you provide credentials, Alert Logic performs comprehensive authenticated vulnerability checks for missing patches and misconfigurations using package information and other local sources of data. For hosts on which Alert Logic performs agent-based scanning, you do not need to provide credentials. If you do not provide credentials or enable agent-based scanning, scans on your assets occur using only methods available to unauthenticated users.
For more information, see Manage your credentials.
Scan Performance
You can choose fewer concurrent scans to reduce scan traffic. A lower number results in slower scans and a longer scan duration. For faster scans and a shorter scan duration, choose a higher number of concurrent scans. The number you choose is a maximum limit. The actual number of concurrent scans does not exceed the selected amount and depends on factors such as appliance resource availability and network bandwidth during the scan window.
For more information, see Adjust scan performance.
Configuration Topology
This topology diagram provides an overview of your scope of protection. You can see which assets are unprotected, or being scanned at the Essentials, Professional, or Enterprise levels.
The protection breakdown displays how many assets are unprotected, excluded, and protected, along with the number of protected assets in each level.
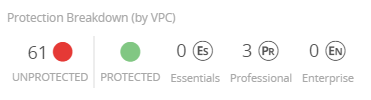
You can search for specific assets. The protection breakdown updates as it finds specific assets.
Installation Instructions
Do not follow the appliance or agent installation instructions on this screen. However, you do need the Unique Registration Key, located on the Appliances tab, when you claim your appliance and register your agents.
Copy, deploy, and claim the appliance VM
To perform these tasks, you must use the gcloud command-line tool to log into your GCP account.
You must also be prepared to configure the appliance firewall rules for the US or UK/EU.
Copy the appliance VM image to your GCP project
At the command line type the following commands:
gcloud config set project <project name>
gcloud compute images create al-threat-appliance --source-uri=https://storage.googleapis.com/threat/al-threat-appliance.tar.gz
Deploy the appliance
Alert Logic provides a Jinja template for GCP appliance deployment. You can download the template from this location.
The Jinja template uses the parameters described below:
- region: The region to deploy this appliance (us-central1)
- zone: The zone for the appliance (us-central1-a)
- network: The network name for the appliance
- sub_network: The name of the subnet inside the network
- firewall_tag: The target tag to be assigned for firewall rules
- claim_cidr: The source IP CIDR that is allowed to perform web claim on port 80, i.e. 0.0.0.0/0 or specific subnet range
- network_cidr: The network CIDR for the appliance (not subnet / sub network CIDR)
- machine_image: The image name for the appliance
- machine_type: The minimum recommendation is n1-standard-4
Use the gcloud command-line tool to deploy the appliance with the Jinja template. The following example CLI command illustrates usage of the template and its parameters:
Claim the appliance
You must claim the appliance VM after it spins up. Appliance claim registers the appliance with the Alert Logic backend and links the appliance with your Alert Logic account. To claim your appliance, you will need the Unique Registration Key for every network you configured in the Data Center deployment. You can find the keys on the Installation Instructions page of your Data Center deployment in the Alert Logic console.
To claim your appliance:
- Open a web browser and enter the public IP address for the appliance as the URL.
- When prompted, provide the Unique Registration Key associated with the network where the appliance resides.
As part of the provisioning process the appliance updates itself to the latest version of all its components and security content. This process can take 20-30 minutes. When the claiming process is complete, the appliance appears on the Health page in the Alert Logic console and is ready for use.
Install the agent
If you enabled agent-based scanning, install the agent on each host for which you want Alert Logic to perform agent-based scans.
Click the links below for more information and to download the appropriate agent:
Update the Alert Logic agent firewall rules
Ensure the proper outbound firewall rules are in place for the node where you installed the agent. For information about firewall rules, see Alert Logic firewall rules for the US or UK/EU.
Verify the health of your deployment
After you create your deployment, access the Health console in the Alert Logic console to determine the health of your networks, appliances, and agents, and then make any necessary changes.